
TL;DR

Get tools and workshop supplies delivered free — and shop member deals
- Fast, free delivery on millions of items
- Access to Prime Big Deal Days deals on October 6–7
- Prime Video, Amazon Music and more included
Rake the lower 3–6 feet of reachable roof within 12–24 hours after a major storm and before sunshine or warmer air starts melting the snow. Recheck after drifting, new snowfall, and each freeze-thaw cycle, but treat roof raking as short-term damage control rather than a cure for attic heat loss.
A roof can look calm under a smooth white blanket while water is quietly pooling beneath it. Heat escaping from your home warms the upper roof, snow melts, and the water runs toward colder eaves, where it freezes into a hard ridge that blocks the next wave of meltwater.
The useful window for roof raking is often short. You may have 12–24 hours after the storm, or less when bright sun hits a dark roof, to remove snow before it becomes a dense, wet crust. This guide gives you a condition-based raking schedule, the roof areas worth your effort, and clear signs that the job has moved beyond safe homeowner work.
You do not need to polish the roof bare or drag a rake across every square foot. You need to reduce the snow feeding the dam, stay outside the falling-snow zone, and know when to call an insured roofing professional. Roof raking can lower immediate risk, but air sealing and insulation handle the heat loss that starts the cycle.
Rake reachable eaves within 12–24 hours after a major storm and always before the first thaw or strong sunshine.
Clear the lower 3–6 feet above the eaves, plus reachable valleys, dormers, shaded slopes, and repeat-problem areas.
Work from firm ground in shallow passes, leave a thin layer over the roofing, and keep the drop zone empty.
Do not chop established ice; active leaks, thick dams, steep roofs, solar arrays, and nearby power lines call for qualified professional help.
Treat raking as short-term meltwater control, then use air sealing, insulation, and properly designed ventilation to address the heat loss.
Ice Dams After Big Storms: The Raking Schedule That Prevents Them
Rake reachable eaves within 12–24 hours—and before sunshine or warmer air starts the melt. Clear only the snow feeding the cold roof edge. Roof raking lowers immediate risk; air sealing and insulation address the heat loss that starts the cycle.
Act while snow is loose, before meltwater reaches the eaves.
Clear above reachable eaves—not every square foot of roof.
Use a purpose-built rake from firm ground and outside the drop zone.
The condition-based raking schedule
The calendar does not set the deadline—the roof does. Sun, warmer air, drifting, roof shape, and attic heat loss can shorten the useful window. Remove reachable snow before it melts, not after it freezes into a bonded ridge.
Control deep buildup
If weather is calm and visibility is good, clear reachable eaves after roughly 6–12 inches accumulates.
Rake the eaves
Clear the lower 3–6 feet, then reachable valleys and familiar problem areas while snow remains loose.
Beat the melt
Finish before direct sun or above-freezing air begins supplying steady meltwater beneath the snowpack.
Recheck deposits
Inspect from the ground and repeat where wind rebuilds snow beside dormers, valleys, and intersections.
Inspect daily
Remove fresh snow promptly, but leave firmly bonded ice untouched and watch ceilings for moisture.
Example: Eight inches overnight followed by bright sun and a 35°F afternoon makes an 8 a.m. pass far more useful than waiting until evening.
First thaw = real deadlineClear the five areas with the biggest payoff
Treat the roof like a miniature watershed. Broad upper slopes feed narrow valleys; valleys feed cold eaves. Concentrate on places where meltwater gathers rather than adding risk by clearing the whole roof.
Eaves
Clear the lower 3–6 feet above exterior walls where runoff reaches the cold edge and refreezes.
Valleys
Remove reachable loose deposits where the V-shaped channel concentrates snow and water.
Dormers
Watch lower sides of dormers, skylights, chimneys, and roof-wall intersections for uneven melting.
Shaded slopes
North-facing areas stay colder and hold snow while sunny upper surfaces may already be dripping.
Repeat trouble
Prior stains, wet soffits, or last winter’s ice ridge identify where inspection should begin.
Snow depth is only half the forecast
A moderate snowfall followed by bright sun and freezing nights can produce a worse dam than deeper snow held consistently cold. Ice dams require meltwater plus a freezing roof edge—not a specific snow depth.
| Roof and weather condition | Priority | Practical response |
|---|---|---|
| 6–12 inches of fresh snow with steady cold | Moderate | Clear reachable eaves during a safe weather window. |
| Moderate snow with strong sun or air above freezing | High | Rake before direct sun reaches known problem slopes. |
| Deep drift in a valley or beside a dormer | High | Remove reachable loose layers without standing below the drift. |
| Fresh snow over firmly bonded ice | Snow only | Rake the fresh layer; leave solid ice for a professional. |
| Consistent cold with no signs of interior heat loss | Lower | Inspect daily; act if dripping, icicles, or uneven melting appears. |
Ground-only, shallow-pass method
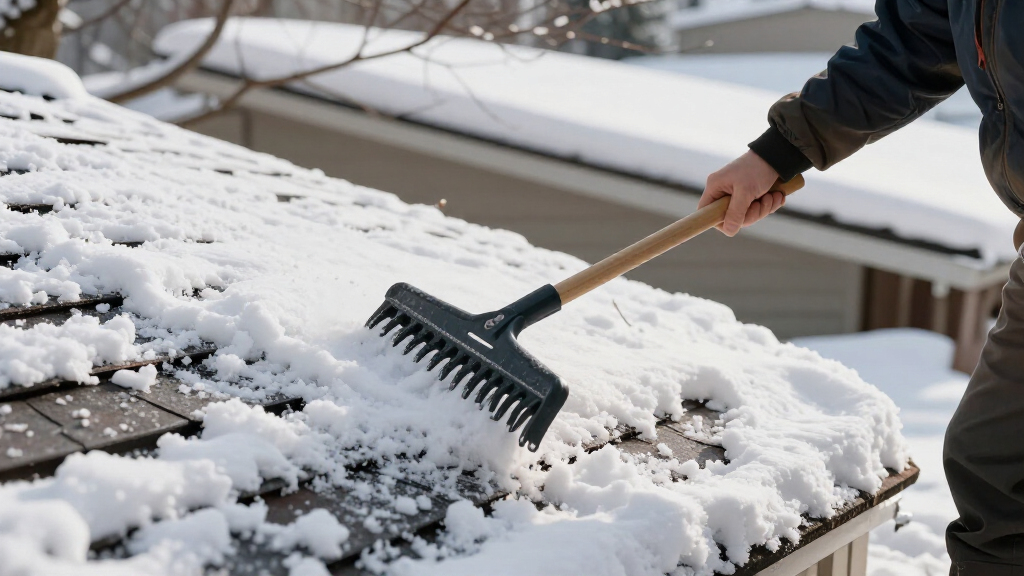
A roof rake is damage control, not an invitation to climb. Use a guarded tool from firm ground, keep the falling load small, and leave a thin layer of snow over the roofing surface.
Make each pass controlled
- Use a purpose-built rake with an extension handle, rollers, wheels, or a protective edge.
- Begin at the roof edge and work upward gradually in shallow layers.
- Leave a thin snow layer rather than scraping shingles bare.
- Keep people, pets, vehicles, and fragile property outside the drop zone.
- Wear eye protection, gloves, and a hard hat on packed, level footing.
- Follow manufacturer guidance for metal, slate, tile, solar, and low-slope roofs.
Stop and call an insured professional
- A thick ice ridge is already established or water is trapped behind it.
- Ceilings, soffits, or exterior walls are wet, stained, blistering, or actively leaking.
- The roof is high, steep, fragile, complex, inaccessible, or fitted with solar arrays.
- Power lines, a buried service drop, large icicles, or unpredictable sliding are nearby.
- Gutters are packed, distorted, or pulling away under ice weight.
- Snow load appears excessive or the structure shows distress.
Never use a ladder on snow or ice, walk onto a snowy roof, or chop bonded ice. A ceiling repair costs less than a fall.
Break the immediate chain—then fix the source
Use This Raking Schedule Before Meltwater Reaches the Eaves
Ice Dams After Big Storms: The Raking Schedule That Prevents Them works by clearing reachable eaves in short, timed passes: during deep accumulation, within 12–24 hours after the storm, and before the first thaw or strong sunshine. That timing cuts the meltwater supply while snow remains loose enough to move from the ground.
- During a long storm: If conditions are calm and visibility is good, clear reachable eaves after roughly 6–12 inches of accumulation. Stop during high winds, lightning, blowing snow, or falling roof ice.
- Within 12–24 hours: Rake the lower 3–6 feet above the eaves, then address reachable valleys and familiar trouble spots. Fresh powder slides with a soft hiss; compacted snow pulls like wet concrete.
- Before the first thaw: Finish before warmer air or direct sun creates a steady flow of water under the snowpack. This is the deadline that matters most.
- After drifting or new snow: Inspect from the ground and repeat where wind has rebuilt deposits around dormers, valleys, and roof intersections.
- During freeze-thaw weather: Check the roof daily. Remove fresh snow, but leave firmly bonded ice alone.
For example, suppose eight inches falls overnight and the forecast calls for sunshine with an afternoon high of 35°F. Raking at 8 a.m. is far more useful than waiting until evening, when the eaves may already wear a glassy ridge of refrozen water. The schedule follows roof conditions, not the calendar.
Best working rule: Remove reachable snow before it melts, not after it freezes into a problem you cannot safely pull down.
As an affiliate, we earn on qualifying purchases.
Clear These Five Roof Areas for the Biggest Payoff
Ice Dams After Big Storms: The Raking Schedule That Prevents Them focuses effort where snowmelt collects or meets a cold edge. Start with the lower roof above exterior walls, then target valleys, dormers, shaded slopes, and places with a history of ice. Clearing the whole roof usually adds risk without equal benefit.
- Eaves and exterior walls: Clear the lower 3–6 feet, where water commonly reaches the cold roof edge and refreezes.
- Valleys: Remove reachable deposits because the V-shaped channel gathers snow and directs water into a narrow path.
- Dormers, skylights, and chimneys: Watch the lower sides of these features, where warm surfaces, flashing, and shade create uneven melting.
- North-facing slopes: These surfaces stay colder and hold snow longer, even while a sunny upper slope starts dripping.
- Repeat-problem areas: A brown ceiling stain or last winter’s ice ridge tells you where to look first.
Think of the roof like a watershed in miniature. Broad upper slopes feed narrow valleys, and valleys feed the eaves. On a Cape-style house, for example, a dormer valley may hold a knee-deep wedge while the open roof has only six inches; removing that wedge can matter more than clearing an extra 200 square feet of harmless powder.
Do not stand beneath a valley or dormer while pulling snow. Build your work path from the edge upward in shallow layers, keeping the falling load small and predictable. The next question is whether your rake, footing, and drop zone make even that limited work safe.
As an affiliate, we earn on qualifying purchases.
Protect Yourself and the Roof With a Ground-Only Method
Ice Dams After Big Storms: The Raking Schedule That Prevents Them only works safely when you remain on firm ground, use a purpose-built roof rake, and stay outside the slide path. Pull snow in shallow layers, leave a thin protective layer over the roofing, and keep people, pets, and vehicles away.
Start near the roof edge and work upward a little at a time. A rake with rollers, wheels, or a guarded edge reduces scraping, while a telescoping handle keeps your boots on packed, level ground. Wear eye protection, gloves, and a hard hat, and never work near overhead power lines or a buried service drop.
Imagine pulling a full 18-inch slab from ten feet overhead. The snow can break loose like a loaded dump-bed, burying your rake and slamming into your shoulders. Several light passes give you control; one heroic pull gives gravity control.
Avoid ladders on snow, and never walk onto a snowy roof. Metal roofing can release an entire sheet without warning, while slate, tile, brittle shingles, solar arrays, and low-slope assemblies need manufacturer-approved methods. High, steep, fragile, complex, or inaccessible roofs belong with an insured snow-removal or roofing contractor.
Safety warning: Stop if snow begins sliding unpredictably, the rake approaches wiring, or you cannot keep your body clear of the drop zone. A ceiling repair costs less than a fall.
As an affiliate, we earn on qualifying purchases.
Let Weather Conditions Set the Deadline, Not Snow Depth Alone
The first thaw sets your real deadline because ice dams need meltwater and a freezing edge, not a specific snow depth. Six inches followed by strong sun and a 36°F afternoon can create more trouble than 18 inches held at 10°F. Watch temperature, sun, wind, and drifting together.
| Roof and weather condition | Raking priority | Practical response |
|---|---|---|
| 6–12 inches of fresh snow with steady cold | Moderate | Clear reachable eaves during a safe weather window. |
| Moderate snow with sun or temperatures above freezing | High | Rake before direct sun reaches known problem slopes. |
| Deep drift in a valley or beside a dormer | High | Remove reachable loose layers without standing below the drift. |
| Fresh snow over bonded ice | High for snow, none for mechanical ice removal | Rake the fresh layer and leave the solid ice for a professional. |
| Consistent cold with no interior heat-loss signs | Lower | Inspect daily and act if dripping, icicles, or uneven melting appears. |
Here is a common scenario: the shaded north eave stays at 20°F while sunlight warms the dark upper roof. Water trickles under the snow, reaches the cold edge, and freezes with a faint glassy sheen. By sunset, that thin lip becomes a dam for the next day’s melt.
Wind changes the calculation too. A bare ridge can sit above a three-foot drift packed into a valley, much like sand piling behind a fence. Recheck after gusty weather, even if no new snow fell, because drifting can rebuild the exact deposit you removed that morning.
As an affiliate, we earn on qualifying purchases.
Know When Raking Is Too Late and Professional Removal Is Safer
Roof raking is too late when a thick ice ridge already traps water, interior leakage begins, or the roof cannot be reached safely from the ground. At that point, stop mechanical work, protect the interior, and call a qualified ice-dam or roofing professional. Established ice requires controlled removal, not force.
Look for a heavy ridge along the eaves, water sitting behind the ridge, distorted gutters, wet soffits, damp insulation, or ceiling paint that bubbles like a blister. Large icicles alone do not prove water has backed up, but icicles paired with ice spread across the roof edge signal active melting and refreezing.
Never attack an ice dam with an axe, hammer, shovel, or pressure washer. One misplaced strike can split shingles, puncture underlayment, or send a jagged block through a window. Professionals generally favor low-pressure steam over chopping because steam cuts through ice with less mechanical impact when trained crews use it correctly.
If water is dripping through a ceiling light, switch off the affected circuit at the panel only if you can reach it without entering a wet area. Keep away from wet outlets and fixtures, move belongings, contain drips, photograph the damage, and call a licensed electrician if water has reached electrical equipment.
Calcium-chloride-filled fabric tubes can sometimes cut temporary drainage channels, but they are not a complete removal method and may harm metal, roofing, plants, or finishes. Do not use rock salt or open flames. Temporary relief is one thing; a scorched roof edge is another.
Fix the Heat Loss So You Are Not Raking After Every Storm
Permanent ice-dam control keeps the roof deck uniformly cold by stopping indoor heat before it reaches the snow. Roof raking can reduce meltwater after a storm, but the lasting work is attic air sealing, followed by suitable insulation and roof ventilation. Ventilation alone cannot cancel a large air leak.
According to University of Minnesota Extension guidance [1], ice dams form when heat escaping into the attic warms the roof while the eaves remain cold. According to the U.S. Department of Energy [2], sealing attic-floor leaks around wiring, plumbing, ducts, light fixtures, and access hatches reduces unwanted heat and air movement before insulation is added.
A common example is an unsealed attic hatch below a clean rectangle of roof surrounded by snow. Warm air rises through the hatch like steam through a loose pot lid, melting the snow directly above it. An energy audit, blower-door test, or infrared scan can locate that narrow heat plume instead of sending you after the entire attic with guesswork.
Seal penetrations with materials rated for their location, then bring insulation to a level suited to your climate and roof assembly. Keep bathroom, kitchen, and dryer exhaust ducts outdoors, seal and insulate attic ductwork, and preserve properly designed soffit-to-ridge airflow. Work around chimneys, recessed lights, combustion vents, wiring, structural members, or spray foam may involve fire-clearance and building-code requirements, so use licensed insulation, electrical, HVAC, or roofing professionals where the assembly demands it.
Infrared cameras and attic temperature, humidity, or leak sensors can reveal trouble earlier, but they do not repair it. The goal is not a gadget-filled attic; it is a quiet, cold roof deck that holds its snow evenly instead of drawing wet streaks toward the eaves.
Frequently Asked Questions
How much snow should fall before I rake the roof?
There is no single trigger for every roof, but many homeowners start after roughly 6–12 inches of fresh snow. Act sooner when a thaw is coming, drifting has filled a valley, or the roof has a history of ice dams. Snow depth matters less than the combination of heat loss, sun, and freezing eaves.
How far up the roof should I clear?
Clearing the lower 3–6 feet above the eaves is a practical starting point for ice-dam control. Extend the work only to reachable valleys, dormers, and known hot spots while you remain safely on the ground. You usually do not need to clear the entire roof.
Can roof raking damage asphalt shingles?
Yes, aggressive scraping can strip granules, lift shingle edges, bend flashing, and cut roofing membranes. Use a roof-specific rake with rollers or a guarded edge, pull straight down in shallow layers, and leave a thin layer of snow over the surface. Stop if the snow has bonded into a hard crust.
Will clean gutters prevent ice dams?
Clean gutters help water drain, but they do not stop roof snow from melting and freezing at cold eaves. Ice dams also form on roofs without gutters. Clear gutters before winter for drainage and weight control, but address attic heat loss for lasting prevention.
Do heat cables solve recurring ice dams?
Listed de-icing cables can maintain narrow drainage paths when a professional designs and installs them for the roof. They consume electricity, require inspection, and do not correct air leaks or missing insulation. Treat cables as a limited control tool, not the main repair.
When should I hire a professional instead of using a roof rake?
Hire an insured professional for steep, high, fragile, or complex roofs, large established dams, active leaks, solar panels, power-line hazards, or deposits you cannot reach from firm ground. Unusual cracking, sagging, ceiling deformation, or sticking doors may signal a structural snow-load problem; leave the building and seek emergency or structural guidance rather than relying on an ice-dam schedule.
Conclusion
Your best move is simple: rake reachable high-risk areas before the first melt, not every square foot after ice has already formed. Put the 12–24-hour check on your storm routine, watch the forecast for sun and warmer air, and stop the moment the roof, wiring, footing, or falling snow moves outside safe ground-based work.
Then use the evidence the roof gives you. A recurring bare patch, frozen valley, or stained ceiling points toward a heat leak that deserves professional diagnosis and repair. The real win is not becoming faster with a rake; it is watching the next storm leave an even white blanket that stays quiet all the way to the eaves.
Fall Picks
fall essentials
As an affiliate, we earn on qualifying purchases.