
TL;DR

Get tools and workshop supplies delivered free — and shop member deals
- Fast, free delivery on millions of items
- Access to Prime Big Deal Days deals on October 6–7
- Prime Video, Amazon Music and more included
Snow blower traction depends on more than tread: equal cold tire pressure, surface conditions, machine balance, ground speed, and operator technique all affect whether the wheels grip or spin. Check pressure and machine setup first, add correctly sized chains for ice or packed snow, and use manufacturer-approved weights only when the drive axle lacks enough load.
A spinning snow blower tire can polish packed snow into glass in a matter of seconds. The engine growls, the tread claws at nothing, and the machine stays planted while cold powder sprays behind the wheels. Adding more throttle rarely fixes that scene; you need to identify what the tires are missing.
This guide shows you how tire pressure, chains, wheel weights, surface conditions, and machine balance work together. You will learn why a chain can transform performance on a glazed incline yet add little in knee-deep powder, and why a heavy homemade ballast plate can burden an axle without fixing the real problem. You will also get a practical order for checking faults before buying hardware.
The goal is controlled movement, not maximum aggression. A machine that bites too hard can scar pavers, dig through loose gravel, resist steering, or pull you down a slope. Start with the specifications in your owner’s manual and tire label [1], then match each adjustment to the symptom you can see and feel. That approach keeps traction predictable, steering manageable, and your driveway free of the metallic scratches that loose chains can leave behind.
Measure both drive tires cold and use the owner’s manual or machine label for pressure; do not treat the sidewall maximum as the operating target.
Choose chains for ice and packed snow, but choose approved wheel or axle-area weights only when insufficient drive-axle loading causes wheelspin.
Fit chains to the exact tire size, check frame clearance, disable the engine or battery during installation, and retension after a short test.
Raise skid shoes on loose gravel, avoid powered wheelspin on finished paving, and follow the manufacturer’s slope limits even after adding traction.
Before buying accessories, inspect wheel locks, belts, friction discs, balance, snow buildup, tire condition, and your ground speed.
Winter traction field guide / Diagnose before adding hardware
Snow Blower Traction: Chains, Wheel Weights and Tire Pressure
Traction is a system, not a tread pattern. Equal cold pressure, surface conditions, machine balance, ground speed and operator technique determine whether the drive wheels grip or polish packed snow into glass. The goal is controlled movement—not maximum aggression.
Measure both drive tires with the same low-pressure gauge.
Metal cross-links bite through polished surface films.
Use only approved ballast at approved mounting points.
More grip can increase marking, digging and steering effort.
01 / Match the remedy to the missing ingredient
Pressure, chains and weights do different jobs
Watch and feel what the machine is doing. A sideways pull, surface slip and lightly loaded axle require three different responses.
Correct tire pressure
Excess pressure shrinks the effective contact patch. Unequal pressure can make the machine pull toward one side and turn every pass into a wrestling match.
Never use the sidewall maximum as an automatic operating target. Follow the owner’s manual or machine label.
Best first move: free checkCorrect-size chains
Cross-links reach through slick films on hard-packed snow, polished tracks and icy grades. Their benefit is smaller in deep, loose powder.
Exact tire size and full frame clearance are mandatory. Loose links can strike cables, axles or housings.
Best fit: ice and packed snowApproved wheel weights
Weights can help when tires reach a firm surface but spin because too little machine load rests on the drive axle.
Homemade ballast can overload components, resist steering or shift balance without correcting the real fault.
Best fit: light drive axle02 / Symptom-to-action matrix
Read the machine before buying accessories
The highlighted column is the best first response. Hardware should follow diagnosis—not replace it.
| What you observe | Best first response | Why it fits | Avoid this mistake |
|---|---|---|---|
| Tires spin on polished ice | ✓ Fit exact-size chains | Cross-links break through the slick surface film. | ~ Adding throttle only polishes the track. |
| Aggressive tread spins while the drive end feels light | ✓ Use approved axle-area weights | Added load presses the drive tires against firm ground. | ✗ Do not improvise a heavy ballast plate. |
| Machine pulls to one side | ✓ Equalize pressure; inspect wheel locks | Corrects asymmetry instead of hiding it. | ✗ Ballast can mask the underlying fault. |
| Auger housing climbs over dense snow | ✓ Adjust speed, cut width and approved setup | Housing position and technique are not rear-wheel bite. | ~ Rear weight may worsen front-end lift. |
| Chains contact the frame or cables | ✓ Stop; use correct or low-profile chains | Dynamic clearance matters more than parked clearance. | ✗ Never operate through repeated contact. |
| Traction fades only on loose gravel | ✓ Raise skid shoes and reduce speed | Limits digging and reduces stone intake. | ✗ Extra bite can excavate the surface. |
03 / Relative traction value by condition
Chains dominate on glaze—not in every kind of snow
Conceptual effectiveness scale based on the physical fit between chain cross-links and each surface. These bars compare conditions; they are not manufacturer test results.
Where chains earn their keep
Relative usefulness of correctly fitted tire chains.
Cold-pressure protocol
A small tire contains little air, so temperature changes and slow leaks become noticeable quickly.
- 1Measure cold. Check before operation with one low-pressure gauge.
- 2Use the approved value. Read the manual or machine label—not an assumed sidewall target.
- 3Match both tires. Equalize drive-tire pressure unless the manufacturer says otherwise.
- 4Inspect the hardware. Look for leaks, cracked rubber, bent stems and rim slippage.
- 5Recheck after temperature drops. Winter pressure changes can alter steering and grip.
04 / Safe installation and fault traceability
The five-step traction workflow
Move from basic setup to controlled testing. Stop as soon as the symptom is corrected.
Confirm specifications
Read approved PSI, accessories, mounting points, weight limits and slope guidance.
Inspect the drive system
Check wheel locks, belts, friction disc, tire condition, snow buildup and machine balance.
Correct pressure
Set equal cold pressure and investigate leaks or damaged valve stems.
Match the remedy
Use chains for surface slip; approved weights only for insufficient drive-axle load.
Test and retension
Run slowly for a few rotations, disable ignition and recheck chain fit and clearance.
Start With Tire Pressure Before You Spend a Dollar
Snow blower traction starts with equal, manufacturer-approved tire pressure measured when the tires are cold. Excess pressure shrinks the effective contact patch, while unequal pressure can make the machine pull sideways. Your owner’s manual or machine label gives the operating figure [1]; the tire sidewall often shows a maximum or load rating, not your target PSI.
Imagine rolling the blower from a heated garage at 15 PSI into a driveway sitting at 10 degrees Fahrenheit. Cold air contracts, and these small tires hold so little air that a modest change or slow valve leak becomes easy to feel. The machine may begin tugging toward the softer tire, leaving you wrestling the handles instead of guiding a straight pass.
Check both drive tires with the same low-pressure gauge before the first major storm and again after a sharp temperature drop. Set them equally unless the manufacturer gives a different instruction. While you are crouched beside the axle, inspect cracked rubber, bent valve stems, rim slippage, and the faint hiss of a leak; a soap-and-water film around the valve can reveal a growing bubble.
Do not bleed air below the approved range as a homemade traction mode. Slightly lower pressure can widen the footprint, but too little air invites vague steering, tire damage, bead separation, and reduced chain clearance. One common driveway example is a tire that looks pleasantly squat in the garage, then slips on its rim when the drive system delivers full torque into wet, heavy snow.
Use the specified cold pressure as your baseline. Lowering PSI beyond the approved range is not a safe substitute for chains, sound tread, or correct machine balance.
As an affiliate, we earn on qualifying purchases.
Choose Chains or Weights by Watching What the Machine Does
Snow blower traction improves fastest when you match the accessory to the failure you can observe. Choose chains when the tread slips against ice or packed snow. Choose approved wheel or axle-area weights when the drive axle lacks downward load. If the machine pulls sideways or rides over snow, correct its setup before adding either accessory.
| What you see | Best first response | Why it fits |
|---|---|---|
| Tires spin on polished ice | Correct-size chains | Metal cross-links bite through the slick surface film. |
| Aggressive tread spins while the rear feels light | Approved axle-area weights | Added load presses the drive tires against the ground. |
| Machine pulls to one side | Equalize pressure and inspect wheel locks | Ballast can hide the fault without correcting it. |
| Auger housing climbs over dense snow | Adjust technique, skid shoes, or approved front weight | Front weight controls housing position, not rear-wheel bite. |
| Chains strike the frame | Stop and fit low-profile or correct-size chains | Operating with contact can damage the chain and machine. |
| Traction fades only in loose gravel | Raise skid shoes and reduce speed | More bite may dig holes and feed stones toward the auger. |
Take a typical freeze-thaw driveway. Yesterday’s slush hardens overnight into a blue-gray glaze, and the tires spin even though the machine feels firmly weighted. Chains address that slippery tire-to-surface connection directly. Hanging another 20 pounds of unapproved steel on the frame may make steering heavier while the rubber still skates.
Now change the scene to a lighter battery-electric two-stage machine pushing dense plow spoil. Its tread reaches firm pavement, yet the drive end feels easy to lift and the wheels break loose under load. A model-approved weight system may help if the manufacturer permits it, but a slower gear and half-width cut should come first. According to Outdoor Pro Masters [2], blower traction depends on more than tire tread; snow depth, balance, slope, pressure, and technique all affect whether you get grip or spin.
As an affiliate, we earn on qualifying purchases.
Fit Tire Chains That Bite Without Beating Up the Machine
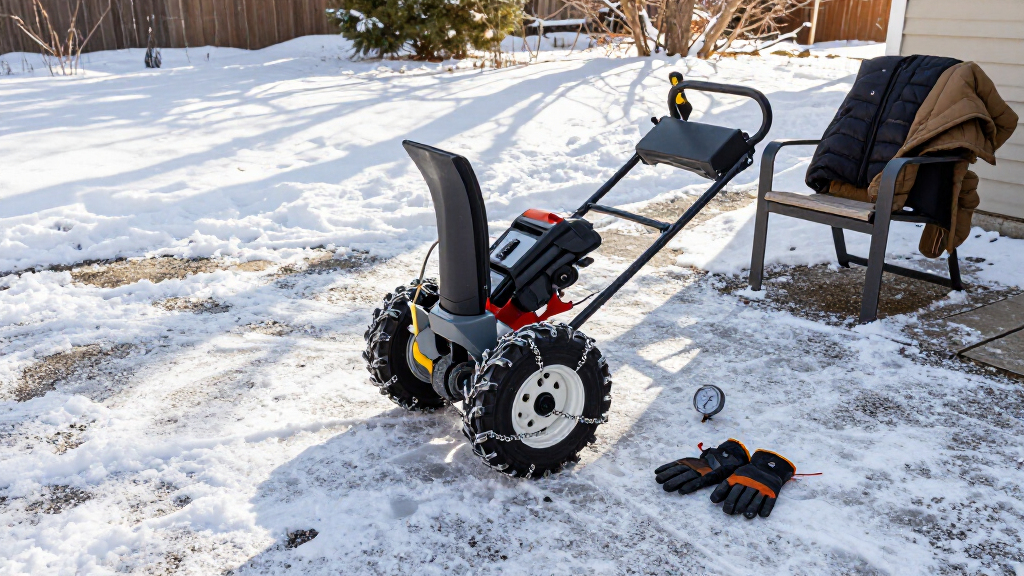
Snow blower traction gains the most from chains on hard-packed snow, polished tire tracks, and icy grades. Buy chains for the tire’s exact size, verify clearance on every side, and center each cross-link across the tread. A loose or oversized chain can whip the frame, axle, housing, or control cable with every wheel rotation.
- Park on a flat, dry surface. Shut off the engine, remove the key, disconnect the spark-plug lead or removable battery, and let hot parts cool. Wear gloves and eye protection before reaching around metal links.
- Confirm pressure and tire size. Inflate both tires to the specified cold pressure before final fitting. Match the chain package to the full size molded into the tire.
- Drape and center the chains. Spread twists out, place cross-links squarely over the tread, and position fasteners where you can reach them without forcing your fingers behind the wheel.
- Fasten both sides evenly. Secure loose ends with the approved connectors or tensioning method. Tensioners can steady a correct chain, but they cannot rescue the wrong size.
- Run a short test and recheck. Move slowly for a few wheel rotations, stop the machine, disable ignition again, and inspect the fit. New installations often settle and loosen.
Clearance matters more than a chain that merely wraps around the rubber. On a tightly packaged compact blower, a standard chain may appear fine while parked, then bow outward under speed and tap a cable bracket with a bright metallic tick. Low-profile chains can create the needed gap, but only when their size and design suit the machine.
Cross-link spacing changes the feel. Two-link chains place cross-links more frequently around the tire, giving a smoother, more continuous bite; four-link chains create wider gaps and a more noticeable pulse. V-bar chains dig harder into severe ice, yet their sharp edges can mark concrete, increase vibration, and load components more harshly. Use them only with manufacturer approval and adequate clearance.
Stop wheelspin as soon as it starts. A spinning chain can scratch pale concrete with dark metal streaks, chip decorative pavers, or dig ruts into an unfrozen gravel drive. Chains work like cleats, not magic: they need a suitable surface and a calm throttle hand.
As an affiliate, we earn on qualifying purchases.
Add Weight at the Right End or Make Handling Worse
Wheel weights improve traction by increasing the load carried near the drive axle, while front weights help hold the auger housing down. Those jobs are not interchangeable. Add only the kit, amount, and mounting hardware approved for your model because misplaced ballast can burden axles, bearings, tires, frames, and the transmission.
You can feel poor rear loading when the drive tires spin while the machine’s back end seems light and lively. A cab or rear-mounted accessory can create the opposite balance problem by shifting weight toward the handles and letting the auger housing climb. In that case, adding still more rear ballast makes the nose even lighter, like loading groceries behind the rear axle of a small trailer.
Front ballast belongs on manufacturer-approved points and serves a different purpose. Consider a blower that repeatedly rides over the hard ridge left by a street plow. If correct skid-shoe adjustment, a slower approach, and partial-width bites do not keep the housing down, an approved front-weight kit may steady the nose. It will not give an icy rear tire the same biting edge as a chain.
Avoid dumbbells tied to handles, steel plates hung from guards, concrete blocks strapped to sheet metal, or any load that can shift. A loose weight becomes a blunt projectile beside a turning wheel, and even a firmly attached homemade load can crack thin panels. Added mass also makes the blower harder to turn, stop, load into a vehicle, and pull free when it sinks into a snowbank.
Traction weight must have a defined job. If you cannot name the balance problem, approved mounting point, and model-specific weight limit, leave the ballast off and diagnose the machine first.
As an affiliate, we earn on qualifying purchases.
Protect Gravel, Pavers, and Slopes While Improving Grip
Snow blower traction must suit the surface beneath the snow, not just the depth on top. Chains can bite beautifully on an icy asphalt lane but scratch concrete, mark pavers, and churn unfrozen gravel. On slopes, extra grip cannot make unsafe terrain safe; the machine’s weight can still pull you downhill when your boots lose purchase.
On loose gravel, raise the skid shoes enough to keep the scraper bar and auger above the stones, especially before several storms build a firm snow base. Take a slow, shallow pass and listen for the ugly clatter of gravel entering the housing. If you hear it, stop, shut the engine down, remove the key, and wait for every moving part to stop before checking the setup.
Chains can dig small trenches when the gravel remains soft. Extra wheel grip may also feed the machine forward faster than the auger can process snow, putting more stones near the intake. A rural owner clearing a 300-foot gravel lane often gets better early-season results from raised skid shoes, low speed, and partial-width passes than from the most aggressive chain available.
Finished concrete and decorative pavers need a gentler plan. Correct pressure, healthy directional tires, smooth acceleration, and early clearing can preserve the surface better than metal links. If you must use chains after an ice storm, avoid tight powered turns and stop spinning immediately; that sharp silver rasp is the sound of metal rubbing a finish you cannot restore with a broom.
For slopes, follow the operating direction and grade limits in the manufacturer instructions [1]. Avoid abrupt turns, drop-offs, sidehill positions prohibited by the manual, and any route where a slip could place you below the machine. Wear boots with solid winter tread, keep both hands in the operating position, and never trust tire chains and extra weight to replace secure footing.
Rule Out These Hidden Faults Before Buying Hardware
Poor traction often starts somewhere other than the tire-to-ground contact. Unequal pressure, an unlocked wheel, a slipping friction disc, a worn belt, frozen linkage, or bad skid-shoe adjustment can mimic weak tread. Accessories may mask the symptom while allowing the real fault to grow into lost drive or damaged parts.
- Inspect both tires: Look for hardened rubber, shallow tread, incorrect sizing, rim slippage, slow leaks, and unequal pressure.
- Check wheel engagement: Confirm that axle pins, differential locks, and wheel-release settings match the manual.
- Watch the drive response: If engine speed stays steady while wheel speed fades under load, inspect the belt, friction disc, hydrostatic drive, or transmission through the prescribed service process.
- Check balance and snow buildup: Remove packed snow around the wheels and note whether a cab or accessory has shifted the machine’s weight.
- Review scraper and skid settings: A housing that drags hard can make a healthy drive system appear weak.
Here is a useful test scenario. Your blower pulls right on bare pavement and packed snow, even after you install matching chains. A pressure check shows 12 PSI on the left and 7 PSI on the right, or an axle pin reveals one wheel in freewheel mode. Equalizing pressure or locking the wheel fixes the pull without adding weight.
Drive-system diagnosis deserves care. Shut the machine off, remove the key, disconnect the spark-plug lead or battery, and let hot components cool before opening any approved service cover. Keep gloves away from sharp belt edges and never place a hand near the auger, impeller, or drive parts while the ignition remains active.
If the manual calls for internal transmission work, specialized adjustment, or electrical testing beyond routine owner service, use a qualified snow-equipment technician. Battery machines can carry high-current wiring even without gasoline, and damaged insulation deserves professional attention. A clean diagnosis costs less than a scorched controller or a blower stranded halfway down a snowy lane.
Use Better Technique to Gain Traction You Already Own
Your operating technique can recover traction without adding a single part. Select a lower ground speed, take partial-width cuts, accelerate smoothly, and let the drive system move the blower. Pushing down or lifting too hard on the handles changes machine balance and can remove load from the very wheels that need grip.
Wet snow exposes poor pacing quickly. Suppose an 8-inch storm ends with a heavy, gray ridge at the driveway entrance. Charging into that full-width bank in a fast gear loads the auger, slows forward motion, and starts wheelspin; taking half the housing width at low speed lets the impeller clear each mouthful before the next one arrives.
Clear before vehicles pack fresh snow into polished tracks whenever your schedule allows. Once a tire spins, release the drive promptly instead of grinding harder. The tread acts like a polishing wheel, warming and compressing the surface until a soft white patch becomes a slick, blue-gray plate that gives the next attempt even less grip.
Use differential lock, axle lock, trigger steering, or independent wheel release exactly as the manual describes [1]. A locked axle can help both wheels push through a straight, stubborn pass, but it can make a tight turn feel like wrestling a loaded wheelbarrow. Steering assistance reduces that effort without changing the basic limits of the surface.
Modern hardware changes the tradeoff, not the physics. Track-drive machines spread load across a larger contact area and perform well on uneven ground or dense snow, though they cost more and often turn less freely. Lighter battery-electric machines feel nimble and avoid fuel fumes, yet some models carry less weight over the drive axle; gas machines often bring more mass and longer refueling-based runtimes, along with noise, exhaust, and maintenance.
Frequently Asked Questions
Do snow blower tire chains really work?
Yes. Tire chains work best on ice and hard-packed snow because their metal cross-links cut into a surface that rubber tread may polish. In loose, deep powder, tread design, machine balance, flotation, and a slower partial-width cut may matter more.
What PSI should I use in snow blower tires?
Use the cold operating pressure listed in your owner’s manual or on the machine label [1]. There is no universal snow blower PSI, and the number molded into the sidewall may represent a maximum or load-related rating. Set both drive tires equally unless your manufacturer directs you otherwise.
Can I lower tire pressure to get more traction?
You can adjust pressure only within the manufacturer-approved range. Going too low can damage the tire, loosen the bead, reduce chain clearance, and make steering feel soft or unpredictable. Treat low pressure as a fault, not a free substitute for chains.
Are wheel weights better than tire chains?
Neither accessory is universally better because chains and weights solve different problems. Chains improve the tire’s bite on ice or packed snow, while weights increase load over the drive wheels. On a glazed driveway, chains usually deliver the more direct improvement.
Can tire chains damage a concrete driveway?
Yes. Metal chains can scratch concrete, stain pale surfaces, or chip decorative pavers, especially when the wheels spin or you make a tight powered turn. Correct pressure, smooth acceleration, and removing chains when conditions do not require them can reduce surface damage.
Why does my snow blower spin even with chains installed?
Check for loose chains, excess tire pressure, poor axle loading, an unsuitable gear, steep terrain, or polished ice. You should also inspect the drive belt, friction disc, wheel locks, differential settings, and snow packed around the undercarriage. Chains cannot correct a slipping drive system or badly unbalanced machine.
Can I use chains and wheel weights together?
You can combine them only when both accessories are approved for your model and the total added mass stays within its limits. The combination can increase grip, but it also adds steering effort and stress to axles, bearings, tires, and drive components. Test the setup slowly on level ground before entering a slope or dense snow.
Conclusion
Match the fix to the failure you can see. Set equal cold pressure first, correct wheel engagement and machine setup, then use chains when the tire cannot bite the surface. Add approved weight only when the drive axle truly needs more load, and keep every accessory within the manufacturer’s clearance and weight limits.
On your next storm, pause when the tires start spinning and read the tracks behind you. A polished patch points toward chains or gentler throttle; a lightly loaded rear end points toward balance; a crooked path points toward pressure or drive engagement. Make that diagnosis before the snow turns to shining ice, and your blower will move with a steady crunch instead of an angry, motionless roar.
Halloween Picks
halloween
As an affiliate, we earn on qualifying purchases.