Canoe
What Piece Of Safety Equipment Is Required On Every Canoe And Kayak?

I get where you’re coming from: “What are the critical safety items I need when I’m out canoeing or kayaking?”
Well, let me tell you, there’s no room for compromise when it comes to your safety on the water. That’s why I’m here to give you the scoop on the one item that should never be forgotten – the Personal Flotation Device, or PFD for short.
This essential piece of gear is required on every canoe and kayak, and for good reason. It can be a lifesaver in emergency situations, providing buoyancy and keeping you afloat.
In this article, we’ll dive into the importance of PFDs in water safety, the different types available for canoeing and kayaking, how to properly fit and adjust them, and much more.
So, let’s get started and make sure you’re fully prepared for your next paddling adventure!

Key Takeaways
- PFDs (Personal Flotation Devices) are the required safety equipment for every canoe and kayak.
- PFDs should be specifically designed for rough waters and whitewater kayaking.
- Choose a certified PFD that meets necessary standards, such as USCG Type III or ISO 12402-5.
- Proper training, practice, and familiarity with safety equipment are crucial for ensuring safety on the water.
Importance of Personal Flotation Devices (PFDs) in Water Safety
Wearing a PFD is an absolute must when it comes to water safety for both canoeists and kayakers. PFDs, also known as life jackets, are designed to keep you afloat in case of an accident or capsize. They are made from various materials such as foam, neoprene, or inflatable chambers, each offering different levels of buoyancy and comfort.
It is important to choose a PFD that fits properly and is appropriate for your activity. PFDs are also subject to certification standards, ensuring they meet specific safety requirements. These standards consider factors like buoyancy, visibility, and durability. Understanding the different types of PFD materials and certification standards is crucial for selecting the right PFD for canoeing and kayaking.
Transitioning into the next section, let’s explore the various types of PFDs for these activities.
Types of PFDs for Canoeing and Kayaking
Using a properly fitted and Coast Guard approved PFD is crucial for your safety while canoeing or kayaking. It’s important to take proper care of your PFD to ensure its effectiveness. After each use, rinse it with fresh water and allow it to dry thoroughly before storing it in a cool, dry place. Regularly inspect your PFD for any signs of wear or damage, and replace it if necessary.
When choosing a PFD, consider your body size and weight, as well as the type of paddling you’ll be doing. There are different PFD sizes and styles available, so it’s important to find one that fits you properly and suits your needs.
In the next section, we’ll discuss the proper fit and adjustment of PFDs for optimal safety.
Proper Fit and Adjustment of PFDs
Make sure your PFD fits snugly and is properly adjusted to ensure maximum comfort and freedom of movement during your paddling adventures. Proper fit is crucial for your safety on the water.
When it comes to PFD sizing guidelines, it’s important to choose the right size based on your weight and chest measurements. PFDs usually come with adjustable straps to customize the fit and ensure a secure hold.
To properly adjust your PFD, start by loosening all the straps and then tighten them gradually, ensuring a snug fit without restricting your breathing or circulation. Always check that the PFD is snug but not too tight. It’s also a good idea to practice adjusting and wearing your PFD before heading out on the water.
Remember, a well-fitting and properly adjusted PFD can make all the difference in keeping you safe during your paddling excursions.
Now, let’s move on to the important topic of PFD maintenance and inspection.
PFD Maintenance and Inspection
Regular maintenance and inspection of your PFD is essential to ensure its effectiveness, with studies showing that over 60% of PFD failures can be attributed to lack of proper care.
To properly care for your PFD, it’s important to store it in a cool, dry place away from direct sunlight and chemicals. Avoid folding or creasing it, as this can damage the foam buoyancy material.
Additionally, regularly inspect your PFD for any signs of wear, such as fraying straps or torn fabric. It’s also crucial to make sure that your PFD meets the required certification and standards, such as the United States Coast Guard (USCG) approval. This ensures that your PFD is designed and tested to provide the necessary buoyancy and performance in emergency situations.
Proper PFD maintenance and inspection not only prolongs its lifespan but also ensures your safety on the water.
Moving on to legal requirements and safety regulations…
Legal Requirements and Safety Regulations
In this discussion, I’ll be addressing the legal requirements and safety regulations surrounding the use of personal flotation devices (PFDs) in various regions.
It’s important to understand that these laws may vary depending on your location, and it’s crucial to comply with them to ensure your safety on the water.
Failure to adhere to these regulations may result in penalties, which can range from fines to potential legal consequences.
PFD Laws and Regulations by Region
Don’t forget to always wear your PFD, as it’s required by law in most regions for both canoeing and kayaking. PFD certification requirements vary by region, but generally, they must meet certain standards to ensure their effectiveness in keeping you safe.
Look for PFD labels and markings that indicate they meet the required certifications, such as the United States Coast Guard (USCG) approval. These labels provide assurance that the PFD has undergone rigorous testing and meets the necessary safety standards.
It’s important to familiarize yourself with the specific PFD laws and regulations in your area to ensure compliance. Failure to wear a PFD can result in penalties, which we’ll discuss in the next section.
Always prioritize your safety and wear your PFD when enjoying the water.
Penalties for Non-Compliance
Make sure you understand the consequences of non-compliance with PFD laws and regulations, or you’ll find yourself sinking under the weight of hefty fines and restricted access to the water.
Penalties for not adhering to PFD requirements can vary depending on the region, but they typically involve fines ranging from $100 to $500. In some cases, repeated offenses can result in even higher penalties or the suspension of your boating privileges.
It’s important to note that these penalties are in place for a reason – to ensure your safety on the water. Wearing a personal flotation device (PFD) is not only a legal requirement, but it can also save your life in case of an accident.
Transitioning to the importance of PFDs for different water conditions, it’s crucial to understand the importance of choosing the right type of PFD for the specific conditions you’ll be facing.
Importance of PFDs for Different Water Conditions
When it comes to canoeing and kayaking, wearing a personal flotation device (PFD) is a must. In calm waters, a PFD provides an extra layer of safety in case of unexpected accidents or emergencies. However, for rough waters and whitewater kayaking, a properly fitted PFD becomes even more crucial. It can help keep you afloat and protect you from strong currents and potential hazards.
PFDs for Calm Waters
Ensure you always wear a PFD when paddling in calm waters! It may seem unnecessary, but accidents can happen anytime, even in calm conditions. Here are some important reasons to wear a PFD:
-
Safety First: A PFD is the best safety equipment to have on a canoe or kayak. It keeps you afloat and minimizes the risk of drowning.
-
Unexpected Circumstances: Even in calm waters, unexpected events like sudden storms or boat collisions can occur. Wearing a PFD ensures you’re prepared for any situation.
-
PFD Alternatives: Some people may consider using other flotation devices, but they may not be as reliable as a PFD. PFDs are specifically designed for water safety.
-
Proper Sizing: It’s crucial to wear a properly-sized PFD that fits snugly. Ill-fitting PFDs can hinder your movement and compromise safety.
Now that we understand the importance of PFDs in calm waters, let’s move on to discussing their significance in rough waters and whitewater kayaking.
PFDs for Rough Waters and Whitewater Kayaking
PFDs are essential for navigating rough waters and whitewater kayaking. When participating in these activities, it is crucial to wear a PFD that is specifically designed for rough waters and whitewater conditions. These PFDs are designed to provide maximum buoyancy and protection in challenging environments.
To ensure the highest level of safety, it is important to choose a PFD that is certified and meets the necessary standards. The United States Coast Guard (USCG) has established specific standards for PFDs, including those for recreational kayaking. These standards ensure that the PFDs are capable of keeping you afloat and providing the necessary buoyancy in rough waters.
Here is a table that summarizes the PFD certifications and standards for recreational kayaking:
| Certification/Standard | Description |
|---|---|
| USCG Type III | PFDs suitable for kayaking and other watersports |
| ISO 12402-5 | European standard for buoyancy aids |
| CE EN 393 | European standard for buoyancy aids for adults |
Understanding and adhering to these certifications and standards will help guarantee your safety while kayaking in rough waters and whitewater conditions. In the next section, we will explore proper paddling techniques and how to effectively use a PFD without compromising safety.
Paddling Techniques and PFD Usage
One important aspect of paddling techniques is to always remember that practice makes perfect. In addition to honing your skills, it’s crucial to select the right PFD and use it properly while on the water.
When it comes to PFD selection, it’s essential to choose one that fits you well, is comfortable, and meets all safety requirements. Proper paddling technique is also essential for a safe and enjoyable experience. This includes using proper body positioning, maintaining a stable and balanced stance, and using efficient strokes.
By practicing these techniques and wearing a suitable PFD, you can ensure your safety while out on the water.
Transitioning into the subsequent section about PFDs for children and pets, it’s important to extend safety measures to all members of your group.
PFDs for Children and Pets
When it comes to taking your children and pets out on the water, make sure they have their own properly fitting and comfortable life jackets to keep them safe and secure. It is important to choose Personal Flotation Devices (PFDs) specifically designed for infants and dogs to ensure a proper fit and maximum safety. Here is a table to help you find the right PFD for your little ones and furry friends:
| Age/Weight Range | PFD Type | Features |
|---|---|---|
| Infants (under 30 lbs) | Type II PFD | Head support and handle |
| Dogs (various sizes) | Dog-specific PFD | Grab handle and reflective trim |
These PFDs provide the necessary buoyancy and support to keep infants and dogs afloat in case of an accident. Remember, it is crucial to always supervise your children and pets while on the water, even with a PFD. In the next section, we will discuss PFD accessories and additional safety equipment.
PFD Accessories and Additional Safety Equipment
To enhance your safety on the water, consider adding PFD accessories and other gear that act as a lifeline, ensuring you stay afloat like a buoy in a stormy sea.
PFD accessories can provide additional functionality and convenience. For example, you can attach a whistle to your PFD, allowing you to attract attention in case of an emergency. Another useful accessory is a waterproof pouch where you can store important items such as a phone or a small first aid kit.
Additionally, consider carrying a throw bag, which can be used to rescue someone who has fallen overboard. Other safety equipment to consider includes a bilge pump for removing water from the canoe or kayak, and a paddle float for self-rescue in case of capsizing.
By equipping yourself with these PFD accessories and additional safety equipment, you can be better prepared for any situation on the water.
Moving on to the importance of regular training and practice…
Importance of Regular Training and Practice
Regular training and practice are crucial for developing and maintaining the necessary skills and expertise to navigate the water safely and effectively. By regularly engaging in training techniques and safety drills, kayakers and canoeists can enhance their abilities and be better prepared for potential hazards on the water. Training sessions can focus on various aspects, including paddling techniques, rescue procedures, and navigation skills. Safety drills simulate emergency situations, such as capsizing or encountering rough waters, allowing individuals to practice their response and improve their reaction time. These drills also help familiarize paddlers with their safety equipment, such as personal flotation devices (PFDs), and ensure they know how to use them effectively. Regular training and practice not only enhance safety but also boost confidence, allowing paddlers to enjoy their time on the water with peace of mind.
| Training Techniques | Safety Drills |
|---|---|
| Paddling techniques | Capsizing and rescues |
| Navigation skills | Emergency response |
| Rescue procedures | Rough water handling |
| Safety equipment familiarization | PFD usage and deployment |
| Reaction time improvement | Communication protocols |
Frequently Asked Questions
How can I properly clean and store my PFD?
To properly clean and store my PFD, I investigated the best methods. I found that using mild soap and water is the proper cleaning method. Storing it in a dry, well-ventilated area is also recommended for longevity.
Are there any specific regulations about the color or design of PFDs?
There are specific regulations on the color of PFDs. These regulations ensure visibility in the water. Additionally, the design of PFDs is important for comfort and ease of movement while ensuring proper buoyancy and safety.
Can I use a PFD that is intended for another water activity, such as boating or fishing?
Yes, you can use a PFD intended for another water activity, such as boating or fishing. However, it is important to consider pfd compatibility. Pros include availability and comfort, but cons include potential lack of appropriate flotation and fit for canoeing or kayaking.
What should I do if my PFD becomes damaged or starts to show signs of wear and tear?
If my PFD becomes damaged or shows signs of wear and tear, I should not attempt to repair it myself. Instead, I should consult the manufacturer’s instructions or contact a professional for guidance on how to proceed.
Are there any additional safety equipment or accessories that are recommended to use with a PFD while canoeing or kayaking?
Using recommended accessories with a PFD while canoeing or kayaking enhances safety. Statistics show that wearing a whistle can increase the chance of being rescued by 40%. Other beneficial accessories include a paddle leash and a waterproof phone case.
Conclusion
In conclusion, it’s crucial to always wear a Personal Flotation Device (PFD) while canoeing or kayaking.
These life-saving devices are like a guardian angel, providing a sense of security and buoyancy on the water.
Remember to choose a PFD that fits properly and inspect it regularly for any signs of wear or damage.
By following safety regulations and practicing proper paddling techniques, you can enjoy your time on the water while staying protected.
Stay safe and happy paddling!

I am Ellen, and I love the wilderness. I grew up exploring the forests and streams near my home, and I have never lost my love for nature.
These days, I spend as much time in the wild as possible. Whether camping, hiking, or simply sitting by a riverbank, I find peace and solace in the natural world. In fact, I would say that nature is my true home.

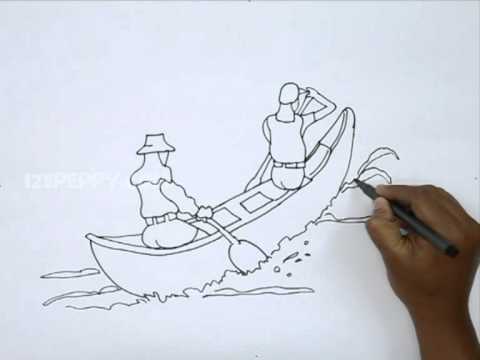
How to Draw a Canoe

To begin mastering the skill of drawing a canoe, the first step is to sketch the shaft. You need to depict a handle on the shaft as well as a curved line within the canoe. Next, draw the paddle blade and an elongated oval shape. Also, make sure to sketch two curved lines on the canoe’s hull. Once you complete these steps, you are ready to start drawing your canoe.
Sorry, I am unable to process the request due to encountered difficulties.
Push-away stroke
The push-away stroke is the opposite of the traditional paddle stroke. The push-away stroke is more efficient because it moves the boat away from the paddler’s side. For the push stroke, the paddler should have his or her arms extended, with the blade facing the water. The paddler then pulls the paddle back toward him or her while pushing with the shaft hand. The paddler then recovers the blade for the second draw stroke.
The stern stroke is used to turn the boat away from the paddling side. The sternperson’s strokes will turn the boat further away from the pivot point of the boat. This can make the paddling less efficient and lead to increased instability. To prevent capsizing, the stern person should use the following stroke, which pushes the stern back in line. The push-away stroke is the most effective when the bowperson is paddling alone.
The forward stroke is the most common type of canoe stroke. It involves positioning the blade at an angle to the canoe’s centerline and drawing it straight back. The push-away stroke is also called the “J” stroke because the paddler is on the side, but pushing the water in the opposite direction. A J-stroke can be used for long paddle trips, as it is efficient and provides course corrections. If you practice it often, it can become second nature and a great way to paddle for long periods of time.
The push-away stroke is a type of paddle stroke that is similar to the pry stroke, but is performed differently. As with the pry stroke, the paddle is held vertically above the gunwale and is pushed away from the hull. The push-away stroke is more awkward and requires more force than the pry stroke. Unlike the pry stroke, however, the push-away stroke utilizes the force more effectively.
To execute the push-away stroke, the paddler must position the paddle blade at an angle of about 20 degrees above the center line. The paddler should also position their shoulders in the water and pivot their shoulders to draw the blade back straight. This allows the paddler to keep the blade parallel to the water. Once the paddler completes the draw, he should track the right side of the canoe.
Cross-draw stroke
When drawing a canoe, it’s important to use the appropriate stroke for the conditions. The cross-draw stroke is similar to the draw stroke, except that it’s done on the opposite side of the boat. Performing this stroke correctly will improve your control of the boat and make it much easier to paddle. It’s also a good way to practice turning. Here are some tips for performing this stroke.
The J-stroke is the simplest turning stroke and can help you steer the canoe in many situations. When used correctly, it can help you enjoy long days out on the water. Practice making turns using the J stroke while sitting in the stern of the canoe. If you’re a novice paddler, it will help you turn quickly. When you’re finished practicing the J stroke, you’ll be able to apply it with confidence.
The cross-draw stroke is a useful maneuver for sharp turns. It’s similar to the pitch stroke, but it requires you to stretch your hand out over the water. It’s an effective stroke when used in a canoe, so practice it in slow speeds before you decide to try it at high speeds. This technique also helps you learn the proper way to paddle in tight turns. In addition to this, it will make it easier to keep your paddling style consistent.
For a faster stroke, try using the cross-draw stroke. By using the cross-draw stroke, you’ll be able to gain momentum as you draw your canoe forward. This technique can help you gain control over your boat. It’s also a great way to increase your endurance. When practicing your cross-draw stroke, it’s important to keep your eye on the water.
The cross-draw stroke is more efficient than the J-stroke when drawing a canoe. This technique requires less muscle, which means you’ll end up with a longer stroke. Moreover, you’ll be able to increase your power to stroke ratio. By using the cross-draw stroke when drawing a canoe, you’ll be able to achieve the perfect balance between speed and power.
Running pry stroke
The running pry stroke is the opposite of the pry stroke and is applied with the blade of the paddle parallel to the canoe’s gunwale. This stroke allows the paddle to move sideways without allowing the canoe to hit anything, and it also slows down the boat. While rowing, keep the paddle blade parallel to the boat and the grip hand over the paddle shaft. The paddle blade should be parallel to the back of the canoe.
The running pry is applied while the canoe is moving. The paddle blade is turned sideways while bracing itself against the gunwale. This force is not generated by force but by the motion of water. This technique slows down the canoe when paddling for long distances. This stroke is a great choice for beginning paddlers. However, it can be difficult to master and requires some experience.
In general, you will want to keep the top hand stationary during the stroke, since it will be acting as the pivot point. You will be making small adjustments in the angle while you’re drawing. You will also want to use a wrist roll if your bow is not completely vertical, as this will make the stroke difficult. However, it’s worth the extra effort to make this stroke work. If you need a more precise angle adjustment, you should use the Superior stroke.
The sweep and the run are complementary strokes that will help you steer your canoe smoothly and efficiently. When used in tandem, they work in harmony to steer the canoe and create the most stability. Ultimately, they must be used in combination to get the most out of the strokes. If you don’t do this, your canoe will lose balance and will not steer well. With practice, you’ll be able to master the sweep and j-stroke.
The bow draw is another accessory stroke, and it’s used to close the turn radius during an eddy. While it’s not as powerful as the running pry, it’s also easier than the outside turn. As it starts to turn, the leading edge of the bow paddle should open up. The leading edge of the bow paddle acts as a brake, so it’s important to have a wide leading edge.
Indian stroke
When you draw a canoe, you use a fundamental stroke, which propels the canoe forward. Many paddlers are unaware of this stroke because it is the most basic and is often wrongly executed. A paddling trip leader from the AMC New York-North Jersey Chapter yells, “vertical paddle!” on outings. This technique involves using the grip hand to draw the canoe across the water.
The Canadian stroke is similar to the J stroke, but there is less push out. The grip hand is in the canoe during recovery, usually in the middle of the chest. The paddle has a slight pitch, which helps the boat move correctly and gives the impression that it is lifting water. The paddle used for this technique should be thin and straight, because it is most easily corrected when the paddle is pitched up. In addition, a straight shaft paddle is best for this stroke.
The J-stroke is similar to the J-stroke but incorporates steering during the recovery phase. It starts like the standard forward stroke but ends with the leading edge of the paddle being turned down aggressively. This maneuver increases the efficiency of the J-stroke in flatwater. It is also useful for correcting the direction of a canoe that has turned too far to the side. The J-stroke is an excellent choice for solo paddlers who don’t want to use a canoe-steering partner.
The draw stroke is another common canoe technique. It starts the same way as the draw stroke, but arcs the paddle downward nearly under the canoe. It ends with a slight burst outward. By following these steps, you can effectively draw a canoe. There are many different strokes to choose from, so make sure you practice all three! You’ll be amazed at how effective and fun they are.
When you’re first learning the stroke, practice in a safe environment. If you have any difficulty, you can learn from a skilled guide. Remember, you’ll be doing many strokes while on a canoe trip, so if you’re using bad form, you’ll quickly burn out. If you’re unsure of which stroke is correct for you, ask a guide to demonstrate it.

I love the outdoors. From camping and hiking in the wilderness, to simply spending time outside surrounded by nature, I enjoy it all. I’m experienced in both backpacking and car camping, and have even done a bit of thru-hiking on the Appalachian Trail.
I grew up in a small town in upstate New York and spent most of my childhood exploring the forests and hills around my home. My parents were always active outdoors people, so I was lucky to be introduced to these activities at an early age.
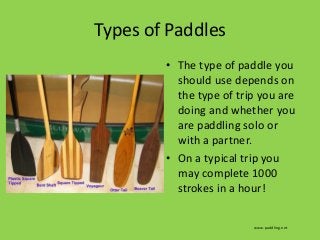
Canoe Paddle Sizing

Choosing the right canoe paddle requires taking into account your body type and size. Selecting a paddle that is the correct length, blade width, and material can enhance your paddling adventure, giving you more confidence on the water. This guide will delve into the different factors to consider when sizing a paddle and help you find the perfect canoe paddle for your unique physique. By the time you finish reading this article, you will be ready to choose the perfect paddle for your next canoe trip!
Proper canoe paddle sizing depends on body type and size
There are several factors to consider when choosing the right size paddle. The length of the shaft, the width of the boat, and the height of the seat will determine the proper size. Paddle lengths vary considerably, but they should be within a reasonable range. A paddle that fits properly will be long enough for the blade to rest above the chin while the upper hand remains comfortably in front of the face.
The length of the canoe paddle shaft, or “throat,” should be adjusted according to the body type and size of the paddler. A longer shaft is better suited for deep lakes, while a shorter blade will be more efficient on a river. The length of the paddle shaft will also be affected by the length of the canoe paddle blade. The overall length of a paddle is also determined by the height of the seat over the water.
The length of the canoe paddle should be adjusted according to the size of the boat. The most common interval for paddle length is three inches. Some paddles are sized at two inches, while others are measured at six inches. The width of the boat and the length of the paddle should be adjusted accordingly, but you should consider your height, body type, and size when choosing the proper length.
There are a few factors to consider when choosing the right canoe paddle. First of all, do not confuse a canoe paddle with an oar. An oar is a different watercraft propelling device that is attached to the gunwales of the boat and is used by two people at a time. They are similar in many ways, but have important differences.
For example, an oval shaft is easier to hold and results in less arm fatigue. Another important factor is grip. Some paddlers prefer a palm grip or T-grip. Whatever style you choose, it should fit comfortably in your hand. Choosing the correct grip will make paddling easier and more comfortable. This is especially important for beginners as they don’t want their hands to cramp.
Length
The overall canoe paddle length is the distance from the seat of the canoe to the water. This measurement is also called “shaft length.” Standard canoe blades measure twenty inches. However, you can find paddles of different lengths, shapes, and sizes. Read on to find out the correct length for you. Listed below are tips for choosing the right paddle for your canoe. And don’t forget to choose the correct paddle grip size!
To determine the proper paddle length, lie on your back. Your knees should be six inches off the floor. Next, take a paddle and hold it with your upper grip hand at nose level. Now, measure the distance from the floor to your nose. Then, take the measurement from there. Using a tape measure, you can also check if the paddle is too short or too long. Remember to account for the extra height the grip adds to the length.
The length of the canoe paddle depends on your size and body structure. Measure the length of your torso while sitting on a chair and add two inches to it. If you’re paddling from the stern of the canoe, you’ll need a shorter paddle, and vice versa. If you plan to paddle from the center of the canoe, it will be longer than the stern.
Another important factor when selecting the proper paddle length is the blades of the paddle. Longer blades require a longer paddle, while short blades will reduce the strain on your shoulders. In addition to the blade length, the tip is another important feature to consider. This part is the bottom part of the canoe paddle. The tip is where the blade makes contact with the water and will help you paddle in a smooth, controlled manner.
The shaft of a canoe paddle can be either straight or bent. The straight shaft is usually two inches longer than its bent counterpart, and is easier to grip than the bent version. Straight shafts are the most popular and versatile and will work for most paddling situations. You can also find bent-shaft canoe paddles in the market. If you have a bent-shaft canoe paddle, make sure to buy the correct length as you’ll be using it frequently.
Blade length
The size of the blade of a canoe paddle is an important consideration. The bigger the blade, the more power the paddle will have. A paddle with a short and skinny blade is not very useful in shallow water because only a small portion of it is under water and will not provide much power. A paddle with a wider blade will provide a lot of power even in shallow water. The size of the paddle blade will also determine the type of paddle you purchase.
Having a longer paddle will increase the power of the stroke and give you more control over the canoe. However, it will take more energy to push the canoe and will cause the paddler to use more force. Also, longer paddles can dig clams in shallow water. They will also make you stand up higher, which can lead to poor posture. Choosing the right blade length will ensure that you get the most out of every stroke.
Once you know the size of the canoe paddle, you can choose the proper blade length. Choose the length based on your height and torso. You should have enough space for your arms and wrist to reach the bottom of the paddle. In addition, you should measure the distance from the seat of your canoe to the bridge of your nose or eye level. If this measurement is not accurate, you can adjust the length to suit your height.
The length and width of the paddle are also important considerations. The blade length and width should be balanced with your style and your ability to paddle. The longer blade will provide more control and finesse and the shorter one will create less turbulence. However, a long paddle can trip up when you are moving on flat water. As long as you have the paddle that fits you well, you’ll have an enjoyable time on the water.
When you choose a paddle, remember to consider the overall length of your body. The length of the shaft should match your height and the width of your canoe. The blade should also be the same length as your body. By using this guide, you can find the perfect paddle for your canoe. It’s also a good idea to measure your canoe and torso. By using the proper measurements, you will have an ideal paddle with a shaft length that matches your body’s needs.
Ovalized shaft
Ovalized shaft canoe paddles are shorter than standard ones. You should measure the length of the paddle’s neck and add the blade length. Standard canoe blades are around 20 inches long. The distance from the tip of the paddle to the end of your nose should be the same length. If you have trouble measuring the length of your paddle, you can also use the broomstick technique.
Ovalized shafts are also easier to hold and have better balance. While a standard paddle shaft is a straight tube, some paddlers prefer an oval shape, as it allows them to see the angle at which they’re holding the blade. Paddle shafts can be made from wood or a composite. A plastic insert can be used to ovalize a round composite paddle shaft. Some paddle shafts are fatter than others, and paddlers with small or medium hands will probably find that a slimmer shaft is easier to handle.
For a more comfortable, efficient paddle, an ovalized shaft is an excellent choice. It is easier to hold, and gives you more control when you’re paddling in shallow waters. Oval shaft canoe paddles are less fatiguing. The grip is rounded and helps to keep your hands from becoming fatigued as you paddle. A paddle with an oval shaft is a good choice for beginners and those who want a more balanced stroke.
A wooden paddle is an excellent choice if you want a traditional look. Wood paddles are flexible and warm on the hands. They can be made of several types of wood, including bent shafts and fiberglass-wrapped blades. Wooden paddles are more expensive but also more durable than lighter paddles. They have an oval shape and a wood blade. They’re made from multiple hardwoods and are lightweight, so they’re not so heavy.
Another difference between oval and round canoe paddles is in the length of the paddle’s shaft. An oval shaft can be easier to grip than a round one, which makes them more durable and comfortable to use. Oval shaft paddles also have a wider throat section that makes them easier to hold in the hand. If you’re new to canoeing, it’s worth looking into the sizing chart to make sure your paddle is sized correctly.
I love the outdoors. From camping and hiking in the wilderness, to simply spending time outside surrounded by nature, I enjoy it all. I’m experienced in both backpacking and car camping, and have even done a bit of thru-hiking on the Appalachian Trail.
I grew up in a small town in upstate New York and spent most of my childhood exploring the forests and hills around my home. My parents were always active outdoors people, so I was lucky to be introduced to these activities at an early age.
How to Paddle Canoe
In order to have a safe and efficient time on the water, it is important to learn the correct techniques for canoe paddling. Mastering a few key paddling strokes is vital. These essential strokes include the Push-away stroke, Indian stroke, Sculling draw stroke, and large back sweep. We will explore these strokes and more in this article. By gaining these skills, you will be ready to navigate the waters with confidence. Embrace these paddling techniques for a safe and pleasurable experience.
Push-away stroke
The push-away stroke has the same purpose as the pry stroke, but is executed differently. This stroke uses more force than the pry stroke and is more awkward. However, it uses the force more effectively and does not damage the paddle. This technique can also be used to slow down or stop a canoe that has forward momentum. Moreover, it can be used by either the stern or bow paddler of a canoe.
The J-stroke is a forward stroke that starts like the standard forward stroke, but then rotates the paddle away from the canoe. This stroke retains the power face of the paddle throughout the motion, reducing the tendency of the canoe to turn while moving forward. It is also known as the “J-stroke” because it traces the letter “J” in the water when performed on the port side.
The push-away stroke starts like a draw stroke, except the paddler turns the paddle blade 90 degrees. It cuts through the water and arcs inward, almost under the canoe. The paddler should slice outward at the end of the stroke so that the stroke does not produce splashes. Once the stroke is complete, the paddler should feel confident in his or her ability to control the canoe.
The push-away stroke is the opposite of the draw stroke. It pushes the canoe away from the paddler’s side. It starts with a paddle blade that is nearly under the canoe. The paddler pulls in with the grip hand while pushing out with the shaft hand. After the paddle has been fully extended, the paddler will recover the blade of the canoe and resume the draw stroke.
Indian stroke
The J stroke is a subtle canoe stroke that provides gentle course corrections and ensures a long day on the water. It is also extremely efficient and can be mastered with a little practice. It is the foundation for almost any canoe adventure. There are many variations of the J stroke, but it is generally the most effective. Practice makes perfect! Whether you paddle a canoe solo, with a partner, or in a group, the J stroke is an essential skill to learn.
The Indian stroke can be performed with either a single or double paddle. When paddling right, the paddle rotates 90 degrees counterclockwise, while if paddling left, the paddle rotates clockwise. As you are returning to your first step, it is important to keep your paddle at a low angle. This technique is perfect for sneaking up on wildlife. However, be sure to always follow the directions provided by the instructor and your guide.
The J stroke can be a useful tool for solo canoe steering. It is easier to control the canoe when paddling solo because you flick your wrist at the end of the stroke. However, it can be difficult to coordinate with a partner because of the pause at the end of the power portion. You’ll also want to make sure to keep your wrist moving throughout the entire stroke to maintain your control.
The forward stroke is the most efficient when the paddle blade is fully immersed in the water. It is also the most effective when the arm of the grip hand is horizontal. This arm should be at the same height as your shoulder. The throat of the paddle should be just above the water’s surface. The length of the paddle is also important to maintain its verticality. If the paddle is angled downward, you will have to adjust your stroke accordingly.
Sculling draw stroke
The sculling draw stroke is an effective paddle technique for lateral motion of the canoe. The sculling draw stroke requires full use of the upper body while making a subtle movement with the paddle. The blade should be held at a slight angle – about two feet above the boat – while moving forward. The angle should be as equal as possible, without too much resistance.
The cross draw stroke is a variation of the draw stroke for paddlers in front of the boat. This stroke is similar to the draw stroke, but it is done on the other side of the canoe. While it is a common stroke, it requires a slightly different approach. The blade is pulled towards the paddler as the paddler pulls. The paddler should place his/her hand on the shaft, while the other hand is placed on the grip of the paddle.
The sculling draw stroke is the most basic stroke in canoe paddling. It requires both hands over the water. The top hand should hold the blade steady as the paddle is pulled in. The blade should be deep into the water and then feathered out 90 degrees for recovery. Then, the boat should be tipped away. This allows the boat to slide sideways easier and provides counterbalance to the paddler.
The J stroke is another basic canoe stroke. This stroke is often used by beginners and white water paddlers. Bill Mason called this style the “Goon Stroke.” It is similar to the forward stroke, except that it uses the opposite side of the paddle to straighten the canoe. The J stroke reduces stroke frequency and is more effective. The J stroke is a very basic stroke, but one that can be perfected with practice.
Large back sweeps
When paddling canoes, the back sweep is an important paddle technique. It increases turning speed. However, large back sweeps slow you down and can be difficult to master if you’re new to the sport. Fortunately, there are techniques that can help you achieve this. Listed below are some tips to improve your back sweep technique. Hopefully, one of them will help you get better on your next paddle.
The first thing to remember is that you can perform large back sweeps while paddling canoes. However, you must be aware that this stroke has different form than other strokes. Therefore, it’s important to practice it at slow speeds. The next step is to find an appropriate paddle position for you. If you’re a left-handed paddler, sit at the bow and use your arms to move your hips. If you’re a right-handed paddler, sit on the stern.
The second step is to adjust the angle of the paddle. While paddling canoes, the right angle of the back sweep will help you turn the canoe in the direction you want it to go. In general, you should have an angled paddle at the end of the stroke so that you can pull the paddle upstream to close the angle. You can also adjust the angle by changing sides while paddling.
Finally, the third step is to adjust the size of your stroke. Using a straight shaft paddle is best for beginners. This will make it easier to make subtle corrections during each stroke. When paddling canoes solo, the right stroke will turn the canoe in the opposite direction and provide more control. This is especially important when you’re paddling alone or in strong wind or current.
Silent stroke
Silent stroke when paddling a canoe means that the athlete does not move the paddle. The stroke is the main propulsion of the boat. But when the paddle is out of the water, it will lose velocity. So, how can the athlete maintain a silent stroke while paddling? To make a silent stroke, the athlete must first understand the principle of propulsion. Then, the athlete should try to implement it in a practice session.
The best way to make a silent stroke is by practicing in waist-deep water with a canoe holding onto it. The most efficient catch requires the blade to be buried at the same angle as it hit the water. Pulling back on the bottom arm will make the blade bury at a different angle and cause turbulence throughout the rest of the stroke. Practicing this technique is crucial.
Developing a silent stroke is a technique every canoe paddler should learn. Good technique and posture will allow the canoe to move faster and farther, conserve strength, and make the paddler invisible to the water. If you can achieve these, your canoe will travel farther than before. If you do not have a paddle, it will be harder to propel the canoe, and it will also be more difficult to balance on the water.
Another way to achieve a silent stroke while paddling a canoe is to make a sharp turn. In this case, you should angle your paddle forward, pointing your chin towards the outside of the canoe. Then, you can start a sprint turn. After you have learned how to do a silent stroke, you can practice paddling a canoe with full power.
I love the outdoors. From camping and hiking in the wilderness, to simply spending time outside surrounded by nature, I enjoy it all. I’m experienced in both backpacking and car camping, and have even done a bit of thru-hiking on the Appalachian Trail.
I grew up in a small town in upstate New York and spent most of my childhood exploring the forests and hills around my home. My parents were always active outdoors people, so I was lucky to be introduced to these activities at an early age.
-
 Canoe1 week ago
How To Build An Outrigger Sailing Canoe
-
 Canoe2 weeks ago
What Does Douche Canoe Mean
-
 Canoe2 weeks ago
How To Build A Canoe Trailer From Scratch
-
 Canoe1 week ago
How To Make A Fibreglass Canoe
-
 Kayak Trailers4 days ago
19 Best Kayak Trailers Reviewed in 2022
-
 Beginners Guides4 weeks ago
Things to Do For Kids in Redwood National Park California
-
 Canoe2 weeks ago
Stillwater Canoe Built By Oldtown What Arethe Demention On The 12 Footer
-
 Canoe2 weeks ago
How To Make Cedar Strips For A Canoe